
Kitra: It’s November, which is when we reveal ourselves to be traitors.
Jordan: The truth is, we both prefer pie to cake in almost all cases.
I feel that way about cake compared to… Most desserts. Ice cream? Hell yes. Flan? Sure. Cookies? Totally. Cake? Eh, depends.
Which is actually part of why this project exists. We’ll make pie on our own, given even the slightest reason to do so. But cake? We really would only make cake for birthdays (of people who don’t like pie), and we had a few go-tos that we didn’t stray far from.
We weren’t developing a massive backlog of unmade pies. But we both had dozens of cake recipes that seemed interesting but we had no occasion for.
However, in November we shake it up. It’s almost Thanksgiving! No one is making cake in November. November belongs to pie.
It’s the perfect excuse for us to unzip these human suits and reveal ourselves to be the pie lizards that we actually are.
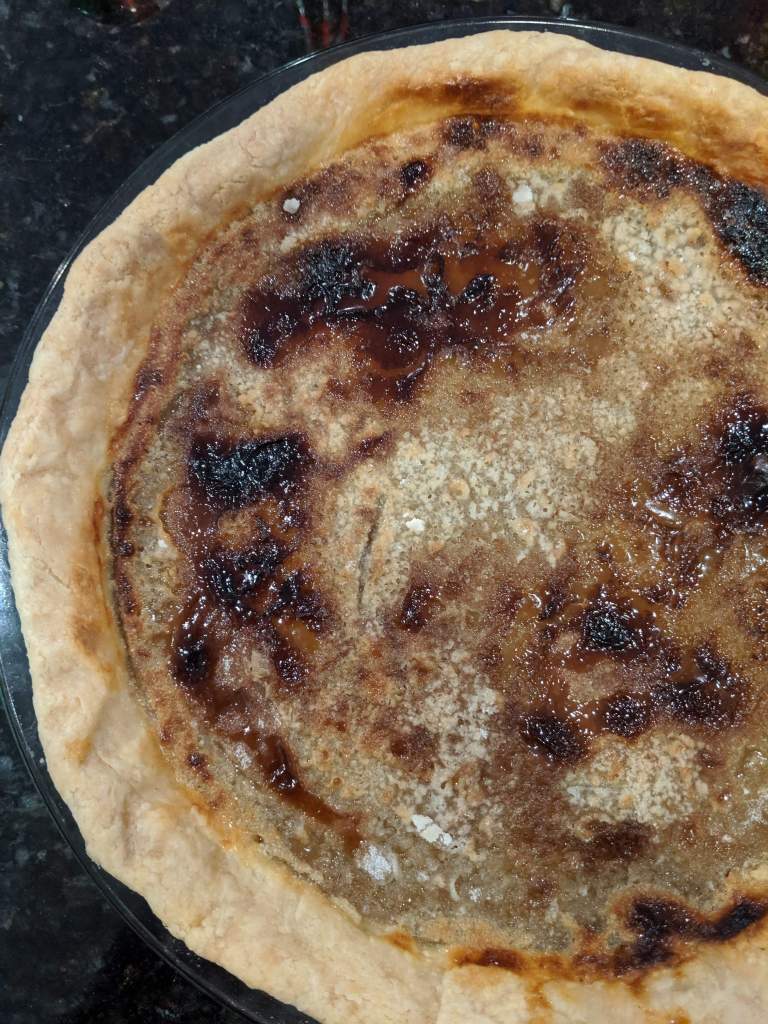
This creme brulee pie turned out to be on both of our “to make” lists. I love a good custard pie, and Kitra loves setting things on fire.
That is wildly incorrect.
But it was funny. In reality, Kitra hates fire but puts up with it for the sake of creme brulee.
We made this week’s decision over “breakfast” (it was noon, okay) in my local cafe/spice shop, where the idea of not throwing a handful of spices into an otherwise classic creme brulee seemed like a PROBLEM.
This was the result. Imagine a cross between your favorite chai latte and a perfectly smooth pumpkin pie, and then cover it in not-quite-burnt sugar.
Or, imagine creme brulee, and I guess put some pastry around it so you can pick it up in your hand and get it into your body faster. 10/10.
Kitra’s first words upon taking a bite were “I love this. This is a perfect pie.” And while there is room in this world for many perfect pies, I agree that this is definitely one of them.
If you don’t already have a deep need to be eating creme brulee pie, please reassess your priorities. Because you’re wrong, and probably a bad person. I don’t make the rules.
We’re signing off here before Kitra gets even more aggressive, but we’ll leave you with the recipe. Enjoy.
You know what needs to be done.

Chai Spiced Creme Brulee Pie
Adapted lightly from Erin McDowell on Food52
Notes
You can use your favorite pie crust if you have one; we’ve included our current favorite below. The technique is similar to Stella Parks’s super-flaky crust, but has butter chunks closer in size to those in a traditional crust, which means it holds together a little better when baked.
Either loose-leaf or tea bags will be fine here, provided that your loose leaf tea is big enough to get caught in your strainer when you get to that point. We threw some extra spices in ours, but we also both like a very strongly spiced chai. Pick something you would enjoy drinking, essentially.
You’ll need 6 egg yolks, but assuming you don’t already have them leftover from something else, don’t worry about separating the eggs before you start. We’ll tell you when the best time to do that is.
If you’d like to make this in advance, you can bake the pie and then refrigerate it for a day or two. Top with sugar and caramelize right before you serve it.
Ingredients
- 1 pie crust, cold (recipe below)
- 1 egg, for egg wash
- 1⅓ cups heavy cream
- ½ teaspoon vanilla extract
- 1 tablespoon loose leaf chai masala tea, or 2 tea bags
- 1-2 teaspoons additional spices (cardamom, cloves, and/or peppercorns), if desired (see note)
- ⅔ cup sugar, divided, plus more to finish
- 6 egg yolks
- Pinch of salt
Directions
Roll out your pie crust and fit it into your pie plate. Trim the edges and roll them under themselves or crimp them, depending on your preference. Prick the bottom of the crust with a fork and set the entire pie plate in the fridge while the oven preheats.
Preheat the oven to 425°. When it’s ready, remove your crust from the fridge and line it with parchment paper. Fill with pie weights, dried beans, or sugar and bake for 8-10 minutes. While it bakes, whisk together the whole egg and a small splash of water in a small bowl.
Remove pie weights and parchment and brush the inside of the crust with the egg wash. Return the crust to the oven and bake for 3-4 minutes. Once done, remove the crust and set it aside to cool to room temperature.
Lower the oven temperature to 325°. While the crust cools, prepare the filling. In a small saucepan, combine heavy cream, vanilla extract, tea, spices (if using), and ⅓ cup of the sugar. Bring to a simmer over medium heat. Remove from heat and let cool for 5-10 minutes. If you haven’t already, this is the time to separate your eggs.
In a medium bowl, whisk together the egg yolks, remaining ⅓ cup of sugar, and pinch of salt. Remove the tea bags from the cream, if you used them. (Whole spices/leaves can stay for now.) Whisking constantly, drizzle the cream mixture as slowly as possible into the egg yolks. Once you’ve poured a third or half of it in, you can speed up, but you want to start slow to avoid cooking the eggs.
Strain the custard through a wire mesh sieve straight into the cooled pie crust. Bake 30-35 minutes, until the edges are set and the center of the pie is no longer liquid. It should still be a bit jiggly, but no longer sloshing around when you move the pie. Let pie cool to room temperature, or refrigerate until you need it.
When you’re ready to serve, sprinkle the top with an even coating of sugar. Use a culinary torch or put the pie under the broiler to caramelize and bubble. If you’re using the broiler, watch carefully so that neither the sugar nor the crust burn. Feel free to reduce your stress level by covering the crust with aluminum foil. Let cool for 5 minutes before serving.
Basic Pie Crust
Ingredients
- 1½ cups (180g) flour
- ½ teaspoon salt
- ½ cup (4 oz, 1 stick) unsalted butter
- ¼ – ½ cup cold water
Directions
In a medium bowl, combine the flour and salt. Cut your butter into a small dice (about ¼- to ⅓-inch cubes) and add them to the flour, separating them as you go. Toss to coat all of the butter in flour and, working quickly, flatten each piece of butter between your thumb and finger. No need to be precise here.
Drizzle about a tablespoon of ice water into the flour mixture and roughly stir with a fork. Repeat, using a tablespoon at a time, until it starts to form medium-sized chunks of dough. At that point, use your hands to bring the dough together, adding slightly more water as you go. Don’t let it get too wet—it should hold together but shouldn’t be wet or sticky.
Wrap dough in plastic and flatten into a rough disc, then refrigerate for at least 45 minutes before rolling out.
