
Kitra: After several fruit cakes, it’s MY TIME. Icebox cakes are my favorite cakes. It’s half whipped cream, and if you don’t want to bake anything you don’t have to, but they’re still beautiful! I LOVE THEM.
Jordan: I’ve never been as wildly excited about icebox cakes as Kitra is, but I do enjoy them and appreciate their brilliance. I also love an old-timey dessert, and icebox cakes came out of the era where “cooking” was shifting more to be “assembling pre-made things.” (Tangent: I read JELL-O Girls this summer and it was GREAT and was in part about this shift in American culture. Highly recommend.)
Icebox cakes are the ideal summer dessert in my mind. Minimal effort (unless, like me, you decided that you’d rather make your own cookies than go to the store), cool, fun at parties (unlike me).
We’ll give you a recipe, but an icebox cake is really more of a method: Take a cookie of your choice, layer it with whipped cream, and let it sit in the fridge for a while so that everything softens together.
The possibilities are endless! There are so many options, from graham crackers to saltines to oreos! From plain whipped cream to fruit or chocolate cream, or a cream cheese situation! Make them small! Make them giant! You. Do. You.
The classic icebox cake is made with chocolate wafer cookies. Kitra disagrees with me on this, but I think they’re kind of annoying to find. There’s one brand (Nabisco) and they’re not all that popular—the picture on the box is of an icebox cake because that’s basically all they’re used for—so you have to have access to a large, well-stocked grocery store (which my nearby stores are not). But if you can find them, you can definitely use them instead of baking your own.
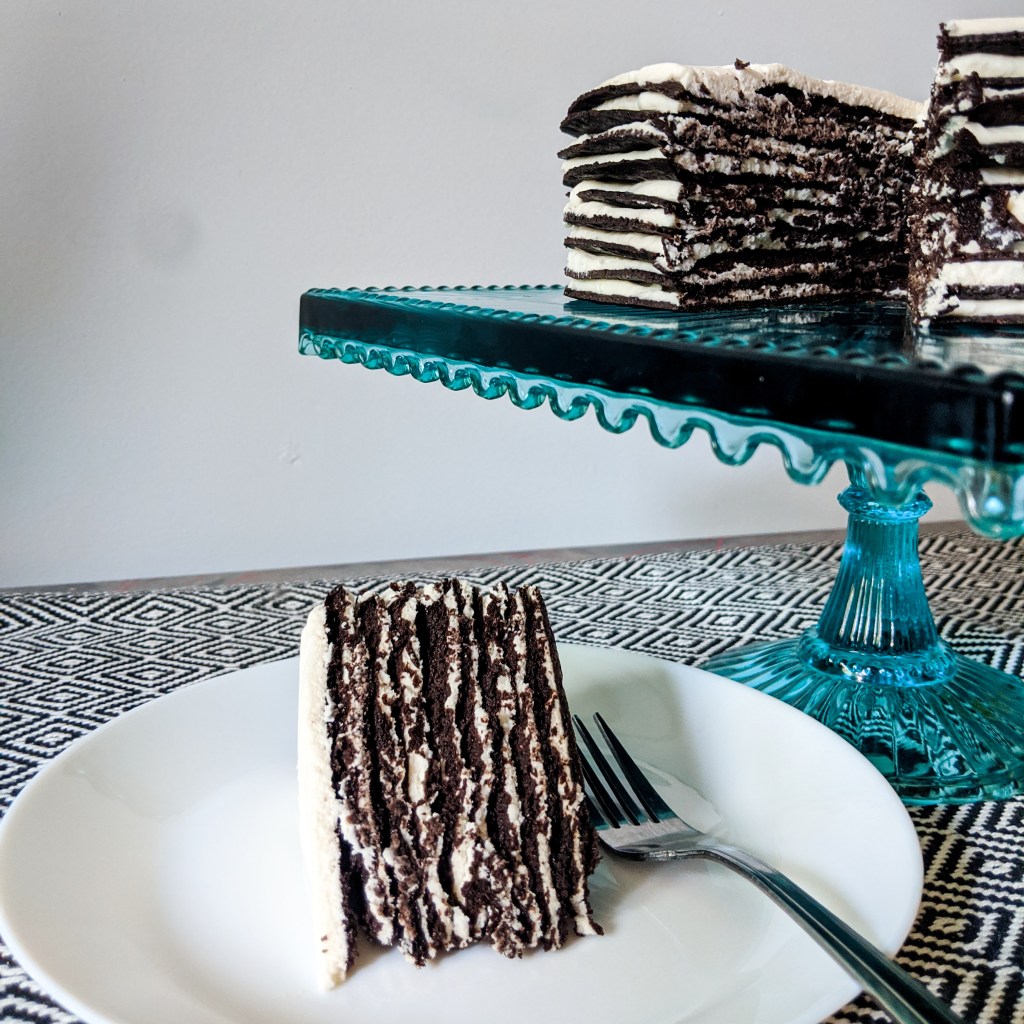
I love the classic here because it’s like a giant, light, fluffy fridge oreo and that’s really all we can hope for in this world.
We’ll leave a lot of notes about strategies for making the cookies below. If you decide to go that route, definitely read through to save some headache when you make them. Though I will say that Kitra’s cookies were much easier than mine to roll out and bake, which may be because I used gluten-free flour.
And just like the flavor and cookie options, there are also a million ways to assemble these suckers. That means do what you want to. I had very little cream in my layers because I ran out of it and didn’t want to go to the store. Jordan had a lot. I made mine in the shape of a layer cake, she did hers in jars. They’re also commonly made in loaf pans. There’s no wrong answers!
And as you make more of these, you’ll learn what you like best. That does require you to make them more than once, but trust us, that won’t be a problem.

Classic Chocolate Icebox Cake
Cookies adapted lightly from Smitten Kitchen
Notes
On cocoa powder: Smitten Kitchen (and basically everyone else) calls for Dutch-process cocoa powder, which neither of us ever has on hand. You’ll be just fine with a regular cocoa. That said, if you have black or onyx cocoa powder, use that for half of the cocoa to make it taste just like an Oreo.
As you can see, you can do this with large or small cookies. Either way, you’ll want to roll them out as thin as possible—shoot for ⅛ of an inch or thinner. For large cookies, you should roll them to about 7 inches and cut them out using a paring knife and a bowl or plate for a template. Depending on how thin you go, you’ll get six or more layers. We’ve included Deb Perelman’s original six in the recipe below, but once you’ve made a few you may want to start doing thinner layers: Kitra started with eight and made a ninth layer from the scraps.
If you’re making small cookies, you have a couple of options. Jordan’s recommendation is to roll out a piece of dough, cut your circles, and then bake without peeling off the excess. As soon as the cookie comes out of the oven, quickly press your cutter into the grooves again to fully separate each cookie. Let it all cool, then pop the cookies out and save the scraps for making cookie crumbs.
If that’s too wasteful for you, go ahead and peel the excess off like usual. Just know that you may need to put your dough in the freezer frequently. It’ll be easiest if you have a thin offset spatula to slip underneath everything as well.
When assembling, you can go for a thin layer of whipped cream or a thicker layer. For a large layer cake, we recommend using something like a cookie/ice cream scoop to make sure each layer gets the same amount. If you’re doing individual ones, you may run out of whipped cream before you run out of cookies, which is perfectly fine. (Jordan had a dozen or so cookies left over, which are now waiting in her cupboard to become a pie/cheesecake crust someday.)
Ingredients
- 1½ cups (195g) flour
- ½ cup (40g) cocoa powder (see note)
- 1 cup (200g) sugar
- ½ teaspoon salt
- ½ teaspoon baking powder
- ½ cup (115g) unsalted butter (softened if mixing without a food processor)
- 1 egg
- 1 teaspoon vanilla extract
- 2 cups whipping cream
- 1-2 tablespoons powdered sugar
- ½ teaspoon vanilla extract
Directions
If using a food processor: Combine flour, cocoa powder, sugar, salt, and baking powder in the bowl of your food processor and pulse to mix. Add butter and run the machine until the butter is fully mixed in; it will look like a coarse powder. Add the egg and 1 teaspoon vanilla extract and run the machine until the dough clumps together into a couple of large masses.
If using an electric mixer (handheld or stand): Beat the softened butter and sugar together until creamy, then add the egg and vanilla and beat again until smooth. Add the cocoa powder, salt, and baking powder and mix until combined, then add flour and beat until it’s a cohesive dough with no visible flour.
Both methods: Preheat your oven to 350°. Divide your dough into 6 (see note); put all but one in the fridge. Roll out one piece as thin as possible between two sheets of parchment paper. Remove the top sheet and cut out one or many circles, depending on how large you’re making your cookies. Transfer the cookie(s), still on the parchment, onto a baking sheet and bake for 8-10 minutes, until firm. When done, let the cookie rest on the pan for about a minute before transferring to a wire rack to cool fully. (If you’re cutting out smaller cookies, do that during the rest as well.)
While your first cookie (or batch thereof) is in the oven, roll out your next one. If you find that you finish rolling with a lot of time before the oven timer goes off, you can either put a second sheet in the oven (if you’re particularly coordinated/organized) or you can put it in the fridge on a cutting board.
Repeat the process of rolling and baking until you’re out of dough. If you’ve been peeling off the excess, you can roll that into another layer as well.
Once all of your cookies are done, make your whipped cream. Using an electric mixer (handheld or stand), combine whipped cream, ½ teaspoon vanilla, and 1 tablespoon powdered sugar. Beat on medium-low speed until it starts to thicken, then taste and add the remaining 1 tablespoon of powdered sugar if you want it to be sweeter. Continue beating until it is thick and fluffy, but be careful not to overwhip—stop before it starts to look clumpy.
Place a dab of whipped cream on the bottom of whatever you’re building your cake on/in. Lay down one cookie, followed by a spoonful of whipped cream. Continue alternating until you run out of cookies, finishing with a layer of whipped cream on top. Cover the cake with plastic wrap or a lid and place in the fridge for 8+ hours to soften. Serve cold.
